Basic Marinara

I’ve had a request for my favorite spaghetti sauce recipe so here is the basic red sauce that I use. I don’t have pictures of my own so I’m borrowing some from the sources linked and you’ll just have to use your imagination for the steps (perhaps I’ll add some next time I make it). Also, I’m sorry if this is hard to read I never measure this stuff so…

cut the ends and peel outer layers off of one medium/large onion quarter it and put it into food processor (if you don’t have one you can just finely chop everything)

add 4-6 cloves of peeled garlic

one large or two small washed carrots with end cut off (don’t bother peeling it, it’s edible!)

2 stalks of celery chopped into a couple of pieces so they’ll fit

lots of fresh herbs (a hand full) I use what I have on hand but ideally it would be basil, oregano, Italian parsley and thyme

process this stuff until it’s like a fine dice, doesn’t have to be pureed

Heat up a large pot (medium heat) and add a bit of olive oil, if I had to guess, I’d say about a tablespoon.

Once the oil is hot add the veg mixture, salt and pepper to taste and sauté until translucent and soft.

Mix in one small can of tomato paste and stir until it is completely incorporated with the veg.

Pour about a cup to a cup and a half of red wine into the pot and let simmer until reduced by at least half. Please only use a wine that you would drink since you will be concentrating the flavor. “Cooking wine” is useless.

Once it’s reduced you can use 1 large can of crushed tomatoes or two cups of pureed fresh tomatoes. If you use canned tomatoes simmer for at least an hour with the lid on (stirring occasionally) then taste and season with salt and pepper to taste. At this point you can add a bit more fresh chopped herbs and then simmer for an additional 30 min with the lid off. If you use fresh you may need to simmer it a bit longer to achieve right flavor and consistency. If it’s too liquidy, simmer longer with the lid off to reduce the liquid. If it’s too thick add a bit of chicken stock until you get it how you want it.

This is obviously something you need to do well ahead of dinner time. Good sauce takes time people!

If you are short on time you should try a puttanesca (which literally translates to “whore’s style spaghetti” in Italian. Maybe because its fast and easy??). It’s rustic and tastes different than marinara (think spicy and briny) but it’s really delicious and looks pretty (healthy too, tastes great with spaghetti squash)!


My quick recipe for that is to sauté chopped garlic and anchovies (yes) in olive oil in a large skillet. Add chopped peppers (sweet or spicy, whichever you prefer), halved or quartered cherry tomatoes, halved pitted olives, capers and chopped fresh herbs. Add a splash of dry white or red wine and then simmer and reduce. Toss it with al dente pasta in the sauté pan and allow the pasta to absorb some of the liquid.

There ya go!

Have a great Thursday! I’ll be celebrating a friend’s birthday tonight so see you tomorrow.

Blog Signature


The Best Hot Cocoa

I shared my best meatball recipe last week and I figured, at this time of year it would make sense to share my hot cocoa recipe. This is a pretty basic recipe you could use as a jumping off point if you wanted to have something more elaborate. I came up with this because I have always loved the frothy yumminess that you get when your marshmallows melt in the hot cocoa so one day when I was making a batch I threw in a handful of them and it was delicious!

DSC_0340 DSC_0306

Makes two servings.

2 cups milk

4 Tbsp. cocoa powder

1 cup mini marshmallows (plus extra for garnish)

1/4 cup sweetened condensed milk

2 candy canes for garnish (optional)

In a heavy-bottomed sauce pan heat the milk on medium-low heat until warm (stirring constantly so the bottom doesn’t scorch). Once the milk is warm, whisk in the cocoa powder until fully integrated then at the marshmallows. Whisk the mixture lightly until the marshmallows are melted then add the sweetened condensed milk and stir to combine.

Divide among two mugs and garnish with mini marshmallows and a candy cane. When you stir the cocoa with your candy cane you will have mint chocolate! I recommend you cozy up by a fire for this one. Christmas music optional but also recommended.

I have some shopping to finish up…do you think the mall will be busy? Yes, I’m afraid. 😦 It’s what I get for procrastinating.

Blog Signature

My very best Meatball

Show of hands; Who likes tender juicy meatballs??

Yea, me too.

This recipe kind of happened by accident. Well, maybe less an accident and perhaps more divine intervention. Who cares about the why or the how, though, these chubby little guys turned out delicious!

I must warn you though, every time I make meatballs my boys tell me that they’re the best ones I’ve ever made. So, if we meet back here next month (the next time I make them again) and I have a new recipe for my very best meatballs…don’t blame me!

The accident part is that they involve ground turkey. Which, I think any self-respecting meatball lover/maker would agree that lean (i.e. flavorless) meats are not usually invited to the meatball party. I pretty much never buy ground turkey either but when I left the market with my groceries this time there was a pound of it in with all my other goodies. I’m not one to complain about free food so I decided to use it and hope for the best.

And, surprisingly, that’s what I got.

I’m just sharing my meatball recipe here but if you want my recipe for red sauce I can share that sometime soon. (?)

Ingredients:

1 lb 90/10 ground beef

1/2 lb ground turkey

3 Tbsp tomato paste

1/2 cup grated parmesan

1/4 cup panko bread crumbs

1 large egg

1/4 cup good red wine

1/4 cup chopped fresh herbs (oregano, thyme and rosemary)

1 tsp crushed red pepper

1 tsp garlic powder

1 tsp onion powder

salt and pepper to taste

Preheat oven to 400 degrees and line a baking sheet with aluminum foil.

IMG_0908

Put everything into a bowl and mix together gently. Don’t leave weird clumps of tomato paste and unmixed egg but you don’t want to over mix it either. The heat from your hands will begin to melt the fat and that’s no bueno.

IMG_0909

Make golf ball-ish sized balls and line them up on the baking sheet. I got 21 meatballs out of this. Bake them until they look nicely browned. I’m ashamed to admit that I have no idea how long this takes. I don’t do timers or watch clocks so I don’t even have a guess. :-/

IMG_0911

Once they are done (you can check by breaking one open) I nestle my little handsomes in a pot of red sauce (set to low) and then grate parm over them, lid the pot and let them sit there for a few minutes while I set the table and/or drink a glass of wine.

IMG_0912

Very. Best. Meatballs.

FYI: Just went to the bathroom and came back to find this…

523675_4789188249906_1624339525_n

She claims she’s working but I bet she’s online shopping. 😉


Enjoy your weekend!

Blog Signature

The Hangover Breakfast – Cheesy Sausage Bread

In stark contrast to Thursday’s whole food version of Toaster Strudels, this cheesy sausage bread has all of the bad stuff that I usually try to avoid. But damn, it’s tasty.

The point of this breakfast (or brunch, lunch, snack or dinner) is that 1. Its quick and easy to make 2. It satisfies the craving for salty fatty food that I almost always have when I had a few drinks the night before.

The hubster and I stayed up late talking and having cocktails on the deck. If you were outside in the DFW area last night then you would have felt the “cold front” that came in and brought the temp down from 105 (!) to a super comfortable perfect for football watching 85 degrees. It was fabulous.
Anyway, that brings me to this. Breakfast in a pinch when you don’t feel like doing anything but sit on the couch all day and eat junk food.

Start out with a tube of breakfast sausage. I use the hot flavor and then mix in maple syrup once it’s cooked. Just cook it through and set it aside to cool.

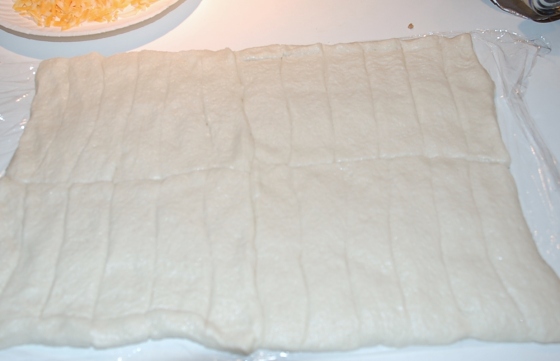
You’ll need two cans of those refrigerated breadsticks. Lay out a piece of plastic wrap or parchment paper and put the breadsticks side by side. Press them into each other a bit to seal the seams but try not to flatten them too much.

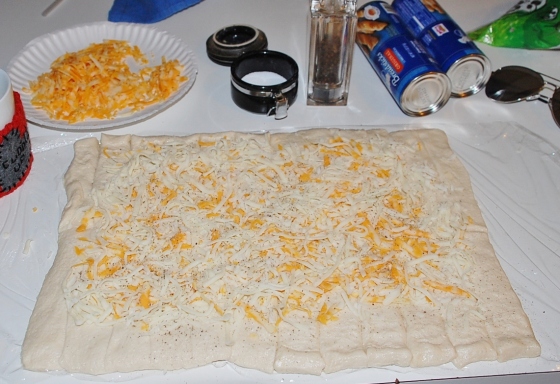
Add your favorite grated cheese. Then lightly salt and pepper. I also added a little garlic powder.

Top with sausage.

Roll it up using the plastic wrap or parchment like you’re rolling sushi. Just not too tight! You want it to be fluffy.

Now put this bad boy in a 350 degree oven (without the plastic please)…

.. until it’s brownish and smells yummy.

You’re welcome.

Sewing Machine Necklace (and a bonus Nowak Stir-fry)

I love to sew.

I also enjoy being able to make something that would otherwise never exist.

Enter, my 20 minute sewing machine necklace.

The inspiration for this came from a similar necklace I saw on Pinterest of a camera.

Buy it here on Etsy: MAKE PIE not war

It’s so adorable but I’m not a camera junkie (although I’m working on that so I can provide some better pictures for you guys). I googled for almost an hour trying to find a sewing machine that resembled it to no avail. When I finally admitted that what I wanted didn’t exist I decided to make one. Easy. Peasy. Right? 🙂

Actually, yes!

Here is what I used

Lobster clasp and jump rings, chain, 20 gauge wire, wire cutters, needle nose pliers, white spray paint, and crude drawing plans

Figure out your shape and draw it on scratch paper. I went with a bit of an older looking machine. Then draw it out in the size you want the necklace to be. I made the starting point where the needle would be and then just fiddled with the wire and pliers until I got it close enough. Then I clipped the wire, twisted it to secure and then did some more fiddling until I had it right. After that, I took it outside and spray painted it. This is not necessary if you have silver or gold wire and like it that way. All I had was copper and I didn’t like the way it looked. I figure if I get tired of the white I can paint it any color I want as many times as I want.

Now on to the bonus: Yummy Stir-fry…Nowak style

This is sort of a collaboration of my husband’s and mine. We received bok choy, broccoli and red bell peppers from the co-op this week so we were inspired to do a stir-fry since we already had all of the other ingredients on hand. We have made similar dishes before with a bit less luck (it always seems something is not quite right) though, we have never even bothered to seek out a recipe (not sure why??). What I’m telling you is that I don’t know if this is how a stir-fry is supposed to be made but this is how we made it and it was yum. I think the key to this one turning out was the little bit of cornstarch added to thicken up the sauce a bit. Bear with me because this has a lot of ingredients. So, here you go.

**Important note: This serves EIGHT. Enough for the four of us to eat a serving and then the rest was mixed together in a foil casserole dish, covered and put in the freezer. This is part of my current undertaking which I’m calling “operation-make-double-of-everything-and-put-half-in-the-freezer-in-order-to-avoid-fast-food-and-expensive-eating-out-during-Jonathan’s-football-season” (currently taking suggestions on a new name).

Supplies:

Wok

Steamer

Sauce Pan

Ingredients:

2 stalks (?) bok choy

3-4 broccoli crowns

1-2 carrots

1 large red bell pepper

1 medium onion (any)

3-5 cloves of garlic depending on size (smaller ones from the inside of the head are stronger so, 3 if they are small and 5 if they are large ones from the outside)

1 chunk of fresh ginger root (2-3 tbsp when minced)

3 boneless skinless chicken breasts

2 cups of dry rice (I use jasmine but you can use any, really)

1 Tbsp toasted sesame oil

1 Tbsp peanut oil

For the sauce:

1/2 cup mirin

3 Tbsp rice vinegar

2 Tbsp soy sauce

1 Tbsp fish sauce

1 Tbsp Worcestershire (sp?)

1 Tbsp chile garlic sauce (this stuff)

1-2 Tbsp honey

1 Tbsp dijon mustard

1/4 cup chicken stock

2-3 Tbsp corn starch

Spice Rub:

2 tsp garlic powder (not garlic salt)

2 tsp onion powder

2 tsp dry mustard

1 tsp chinese 5 spice

1 tsp coriander

1 tsp all spice

1/2 tsp clove

1/2 tsp cinnamon

Garnish:

3 green onion stalks

1 Tbsp black sesame seeds

1 Tbsp white sesame seeds

Ok. Whew! That’s long!

First:

Cut the florets from the broccoli crowns and get them going in the steamer. Then make your rice. For Jasmine it’s one part rice two parts water. Cook the broccoli until its just before tender as it will cook a bit more later.

Next:

Prep your other veggies. I did matchstick-ish cuts on the carrots but you could also just grate them. The pepper got a medium dice. The green onions I sliced on the bias. The big onion sliced in little inch long bits and the garlic and ginger was minced.

Meanwhile, Bo prepared the chicken breast by trimming and cutting it into bite sized pieces then seasoning with salt and pepper to taste and then the spice rub. Place it in a bowl and set aside.

Heat up your wok. Mix together all of the wet sauce ingredients and then whisk the cornstarch in until most of the lumps are gone.

Add the oils to the wok and allow to heat just until it starts to smoke then add the chicken. Cook the chicken through then add the bok choy, carrots, onions and bell pepper. Cook until almost tender then add the ginger and garlic and cook for just another minute or two. Add the broccoli and the sauce and cook just until the sauce begins to thicken. Remove from heat.

Plate with rice on the bottom, spoon the stir-fry over and top with green onions and a sprinkle of sesame seeds.

Eat with chopsticks!

Please reprimand me in the comment section if I left something out or it doesn’t make sense…the little one is tugging at me saying “hold you, mommy. hold you?” so, gotta go!

**UPDATE**

I forgot to mention that you can regrow bok choy from the discarded end piece. Cut about 2 inches from the bottom and place it cut side up in a bowl of shallow water and in a spot that has some natural light. After a couple of days you can plant it in soil with the dirt coming up to just cover the original cut part with the new growth exposed. In a month or two it should be ready to harvest. You can then replant it as you did the first time. It’s an endless cycle!! See my “grow it” page for a list of other veg you can do this with.

Perfect Summer Snack


This is not only the perfect summer snack but it makes a fantastic breakfast or lunch. It’s cool, refreshing and super tasty. It’s certainly nutritious from the high protein and good bacteria in the yogurt to the antioxidants in the blueberries and the immune boosting effects of local raw honey with, of course, the well documented health benefits of almonds. It comes together quickly, too which I think we can all agree is important.

The possibilities are nearly endless as you can create different combinations of fruits, nuts and sweeteners to add to your yogurt. Here is a short list of yummy variations.

Fruits

Peaches, strawberries, bananas, oranges, mangoes, plums, pears and blackberries

Nuts

walnuts, cashews, peanuts (not a true nut but still tasty), pecans, macadamia, pine nuts and hazelnuts

Sweeteners

maple syrup, molasses, stevia and agave nectar


…And now my stomach is growling so loud that the little one is hovering around me and patting my belly asking “hungry mommy?” over and over again. I think we’ll go have a snack 🙂


Enjoy the rest of your day and check back tomorrow because I have a book review to share that I think you’ll appreciate (if I can find the time to finish the last few pages today).


Happy Snacking!

Honey Basil Fruit Salad


This is the best fruit salad I’ve ever had. I ate it for lunch two days in a row!

Ingredients

1 Large Navel Orange diced into bite sized pieces

1 Pear diced

1 Banana sliced

1 cup Blueberries

1 cup sliced Strawberries

1 Tbsp chopped Basil

2 heaping Tbsp plain Greek Yogurt

The zest and juice of one lemon

Honey to taste


Just mix everything together and enjoy!

You can make some substitutions to change it up a bit. Use different combinations of fruit, or herbs (thyme, rosemary or mint are good here), use a special honey (I used wildflower), or you could add vanilla extract, lime instead of lemon, cinnamon or a splash of champagne…the possibilities are endless!

This is also delicious as a smoothie. Just put the fruit salad and some milk into a blender. That’s Jonathan’s favorite 🙂

Enjoy!

Three Grilled Pies

These lovelys are very close to becoming a weekly staple in my household.

They are sooo easy! and did I mention delicious?

Let’s talk about how these pies are made. (is it bothering you that I keep calling them pies? me too.)

In an effort to save time, dishes and my own sanity I used store bought (gasp!) crusts, and sauces. While I am mentally and physically capable of making these things from scratch(I actually enjoy it too), I have been there, done that. I value my playing outside with the family time. Especially, with the amazing weather we’ve been having here in north Texas (we all know it will be hotter than the earth’s core in about 3 weeks…or tomorrow).

In keeping with my overall desire to provide healthy foods for myself and my family, I sought out organic options for the crust and the pizza sauce…the BBQ sauce will always be Stubb’s or homemade in my house.

Moving on…

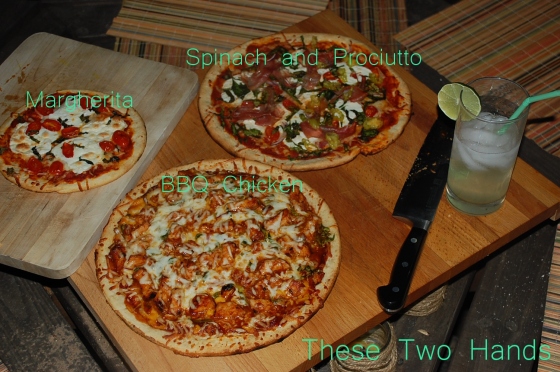
For the Margherita Pie – to the crust I added pizza sauce a light sprinkle of shredded mozzerella, sliced fresh mozzerella, chiffonade of basil and sliced cherry tomatoes.

For the BBQ Chicken Pie – Use BBQ sauce instead of pizza sauce here then a light sprinkle of grated mozzerella and grated sharp cheddar (bbq’s best friend), sliced red onion, chopped fresh spinach and one chopped BBQ grilled chicken breast. For the chicken breast, it’s easy if you do it ahead of time like make an extra on another night that you’re grilling. We simply grilled it before the pies. My husband just salt/peppered the chicken then basted it while on the grill with sauce.

For the Spinach and Prociutto Pie – Add your pizza sauce to the crust then a light sprinkle of shredded mozzerella, sliced fresh mozzerella, chopped spinach (I gave it a toss with olive oil, salt and pepper), chiffonade basil, sliced cherry tomatoes, sliced peperoncinis and prociutto.

Grill and enjoy!

You don’t have to grill them but you should. I love hanging out with my family in the backyard while we wait for them to get nice and crispy and just a smidge charred with a faint taste of the outdoors…you don’t get that from the oven.

Here is my attempt to capture some of this quality family time. From cuteness to chaos and back to unbearable cuteness. 🙂 Keep in mind, I’m no photographer, folks.

Tips for grilling PIES (have you had enough of that yet? ha!):

For gas grills: Turn all burners on high and close the lid until the temperature reaches 500+ degrees. Then turn off back burners and turn front burner down to low. Place your pies on the back burners and rotate often until cheese is melted and crust is crispy.

For charcoal grills: Get your coals going good and then move them to one side of the grill. The idea is to cook the pies with indirect heat so put them on the opposite side of the coals and close the lid. Same here, rotate them until melty and crispy!

Happy Grilling!

Balsamic Glazed Chicken with Carmelized Brussel Sprouts and Roasted Cauliflower

I found these recipes via Pinterest and thought they sounded soooo yummy and they were!! Hubby and I are always trying to figure out ways to fill up on tasty healthy foods for less money. It’s difficult to do when you limit carbs as we typically do so when I found these I was super excited. There are no processed or refined carbs, only the ones in the veggies. It’s also dairy-free if you’re into that sort of thing. I’m fine with it once in a while but a girl’s got to have her cheese! You’ll find that you don’t miss it though 🙂 All three of these recipes come from Eat, Live, Run which I am now following because I love everything about this blog! I kind of followed the recipes (I never do exactly as I’m told, it’s a sickness, really) with a few exceptions…

1.) For the chicken: First of all, I omitted the pesto and mozzarella because it didn’t seem to fit with the sides I planned and it was great without it anyway. I had my lovely sauce wizard husband make a reduction of balsamic vinegar, chicken stock and dijon mustard. Once reduced by about half, we glazed the chicken with  it as we were grilling it and then drizzled the remainder over the chicken after plating.

2.) For the brussel sprouts: I used organic raw sugar instead of brown sugar. As much as I love brown sugar, there is nothing that beats the full, nutty flavor of a good raw sugar.

3.) For the cauliflower: I used  a light sprinkle of my husband’s homemade blackening spice to season the cauliflower rather than what the recipe calls for and it turned out delicious. His recipe is as follows:

Mix together 2 tbsp ancho chile powder, 2 tbsp new mexico chile powder, 2 tbsp sweet paprika, 2 tbsp hot paprika, 2 tbsp cumin, 2 tbsp coriander, 2 tbsp onion powder, 2 tbsp garlic powder, 1 tbsp chipotle powder, 1 tbsp cayenne. Store this in an air tight container like a small tupperware or large empty spice bottle and it will last basically forever. Taste it, if you like it spicier then add more chipotle and/or cayenne. Likewise, if you want it less spicy then reduce the amounts of those.

From Eat, Live, Run

Caramelized Brussel Sprouts recipe here

From Eat, Live, Run

Spicy Roasted Cauliflower recipe here.

From Eat, Live, Run

Grilled Balsamic Chicken recipe here.

You should try these out. Also, poke around on Eat, Live, Run, Jenna is a trained chef and really knows her stuff. I plan on trying more of her recipes and I’ll definitely share that with you when I do so.

Low Fat Berry Banana Pancakes

These are not only low fat but, they are also low calorie and high in protien…and DELICIOUS! My 18 month old daughter loves these pancakes too and I love that she’s getting a full serving of fruit! Be careful though, if you are counting carbs and sugar because these cakes have no shortage that even though the sugar is from fruit. There are ways to reduce the sugar and carbs which I will discuss after the recipe.

Serves: 1

Ingredients:

4 Tbsp Oat bran

1 large egg

2 Tbsp 0% fat greek yogurt

1 packet stevia (or other 0 cal sweetener)

1/4 tsp baking soda (optional makes a fluffier cake but certainly not neccessary)

1/4 cup fresh ripe blueberries – washed

2 Tbsp Organic reduced sugar Strawberry Preserves

2 Tbsp Fat free cream cheese

1/2 Banana sliced

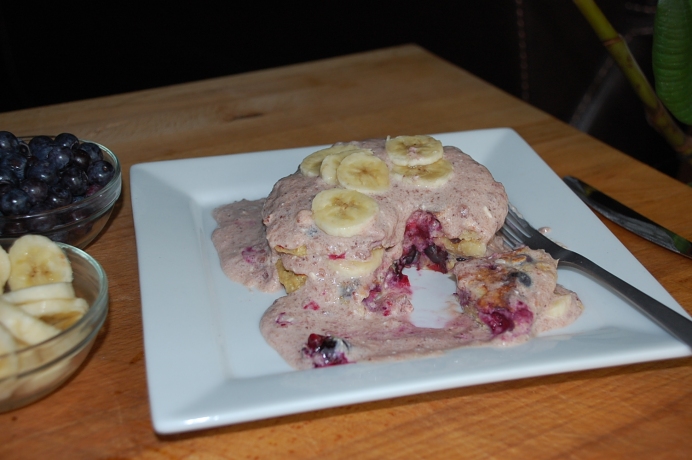
In a medium bowl mix together oat bran, egg, yogurt, stevia and baking soda. Fold in blueberries and set aside. In a small sauce pan (or a glass bowl in microwave) heat strawberry preserves until loose using a wisk to break up chunks. Once somewhat smooth add cream cheese and heat (stirring) until smooth then remove from heat. Heat griddle or saute pan to medium heat with your choice of oil (plenty of fat free cooking sprays – or you could just use bacon fat…ha!). Now cook your oat bran mixture like a regular pancake. This amount makes 2 medium sized cakes (about 4 inches in diameter) which is perfect for 1 person. Once cooked, top your pancakes with the strawberry/cream cheese mixture and then the sliced bananas. Yum!

Nutrition info:

Serving size 2 medium cakes

Amount per serving

Calories 367

Fat 3g

Carbohydrates 55g

Fiber 8g

Sugar 24g

Protien 21g

You can lower the carbs and sugar by using a 1/4 cup of fresh diced strawberries instead of the preserves (saves you 11g of carbs and 10g of sugar). OR you could eliminate the banana (saves you 10g of carbs and 7g of sugar). I have also done a fruit-free version by simply omitting all of the fruit and mixing the warm cream cheese with 1 Tbsp of maple syrup (saves you 16g of carbs and 9g of sugar).

Now find yourself a cutie pie to eat them with!