Regretfully Yours,

Dear Friends,

It pains me to inform you that there has been more than a couple of snafus with the building of my dining table; a project that should have been ready for oohs and ahhs precisely yesterday. Unfortunately, several miscalculations (and wrong cuts) on my part have lead to a lack of completion and a (current) total of three trips to Lowe’s with at least one more in the foreseeable future. The final deadline for this project is midnight Friday….cross your fingers for me! For now, I’m going to meet up with my sis to shop for fabric. I hate to leave you like this… As a consolation for my dropping the ball, please enjoy the recipe below for the laundry soap I’ve been using for almost a year now. It’s cheap cheap cheap (about $10 for a 3 month supply), smells good and works great!

Regretfully Yours,

Sarah

Homemade Laundry Soap

1 bar of dr. Bronner’s castile soap (grated; I think rose smells best)

2 cups each baking soda, borax and super washing soda

Just mix it all together and use 1-2 Tbsp per load.

No more naked walls!

Despite my better judgement, I spent all day yesterday working on dressing up the dining/kitchen walls. This is far from the most pressing item on my very long list of To dos but I just couldn’t resist. And I’m happy about that because it just feels so much more comfy and lived in.

I didn’t buy any artwork for the room. As much as I love art we just can’t afford to spend hundreds-thousands of dollars on beautiful art. I realize you can pick up inexpensive decent stuff at home decor stores but why not DIY?

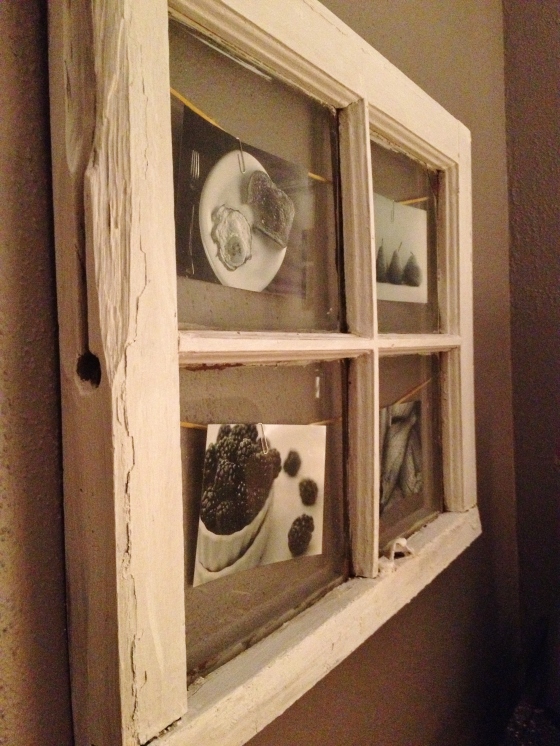
So I stole graciously borrowed cool photographs of food from the web and printed them in various sizes at a photo kiosk in my drug store. I used old frames I already had (all of them I obtained for free) and just updated them to match the rest of the room.

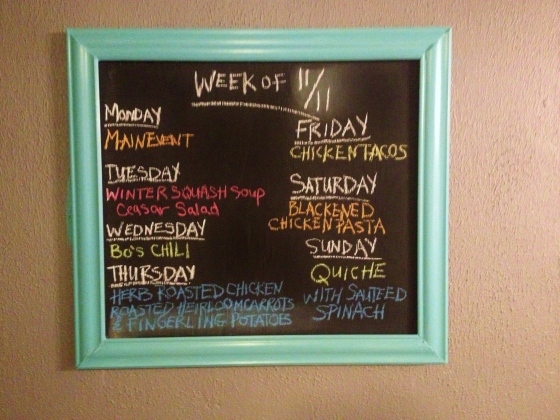
Over the summer my grandparents gave me some old windows from their house which they had lying around after some updates. I originally planned to use the large pane-less one as a wipe off board for our new weekly menu board (as seen on pinterest) but while cleaning out the garage not that long ago, Bo accidentally knocked it over and broke it 😦

What was left was a couple of smaller ones with panes that wouldn’t work for what I wanted so I decided to make a chalkboard for the menu board and use the window to display photos.

For the photo display, I cleaned up the window and gave it a light coat of white paint to freshen it up just a bit (I wanted to retain it’s rustic charm). I stapled lengths of yellow suede cord to the back and paper clipped pictures to it…sort of like a clothesline look. I’m thinking when they come down for Thanksgiving I’m going to get my grandparents to write somewhere on the window their address and the years that this window was a part of it. What an awesome treasure!

For the chalkboard, I used a piece of scrap plywood (which I rescued from a trash pile, obviously). I screwed it in each of the four corners directly to my wall with anchors. I then gave it two coats of chalkboard paint, which I made myself using black paint and non-sanded grout. Do a heaping tablespoon of grout to each half cup of paint. Only make what you need because you can’t store this stuff.

My board is a rectangle of 2′ X 1′ 9″ so I picked up an 8ft piece of moulding at the hardware store. I got the cheapest kind they had (which is not even real wood) for a little over $5. I cut the appropriate lengths with 45 degree angles for mitred corners and just hot glued (yes, hot glued) those bad daddies right onto the wood. I used a little bit of wood filler to clean up the seams in the corners and then lightly sanded it when dry then painted the trim a color somewhere between turquoise and sea foam (mixed it myself).

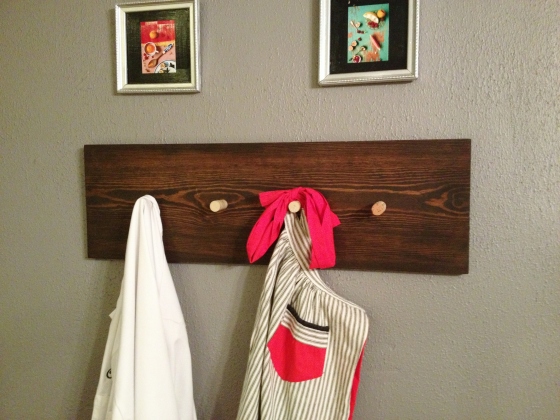
My favorite project from yesterday was the apron (and chef coat) hooks. This was yet another free project! A stained piece of scrap wood + wine corks = EASY, FREE AND CUTE apron hooks! yay for free!

This would be so cute painted a bright funky color but I decided to stain it. I’m a sucker for stained wood but I absolutely hate the sanding part so anytime I have an opportunity to do a small easy-to-sand project, I’m likely going to stain it. So once that part was done…

I drilled holes in the center of the corks just large enough to fit a nail head. Hammered the nails into the board leaving enough sticking out of the board to go slightly more than halfway into the cork. Busted out my trusty sidekick Gertrude (hot glue gun) and filled up the drilled holes in each cork and slipped them over the nails (holding in place until it’s cooled).

So simple…I LOVE IT!

The only expense for all of my wall decor was the moulding and the photos I printed which all together cost me just under $20. 😀

On today’s agenda, the table. I can’t wait to get this done so I can share it with you. If I have time I will also work on painting the stools and the chairs.

You know, I just looked at my dining room inspo pics that I shared with you guys not too long ago and realized that this has morphed into something that really doesn’t even resemble any of that. Odd.

Have a great rest of the day and let’s meet back here tomorrow for some table action! (I hope!)

Coffee Bar = Best space in the house!

I finally finished it, ya’ll! I can’t stop admiring it and now I wonder how I’ve ever lived without it! If you’re a coffee lover I definitely recommend making a coffee bar in your own home. Even if you have limited space (as I do) it’s likely you can make it work. Mine occupies the smallest corner of the dining room which has otherwise been empty since most functional pieces of furniture would never fit. I had a large-ish palm there for a little while but I think this is such a better use of space!

This project made me feel a bit like Dr. Frankenstein and you’re about to see why. I was never able to find the perfect piece to make-over (one that fit in my budget, that is) so I had to mix and match to get what I wanted.

Here’s what I started out with. Two small (very small) silver cabinets about a foot wide each and 1 and half feet tall for $15. The little shelf I got on a garbage digging excursion (but it’s not part of this project) and the white cabinet was $5.

I took the little feet off the two silver cabinets and busted out the jigsaw. I had to eliminate the overhang of the trim around the top and bottom.

Now, here is where the Frankenstein comes in. Using some scrap plywood I retrieved from someone’s curbside donation pile (better?) I cut a piece in the size of the bottoms of the two cabinets side by side and then glued and screwed them to it. I then used a metal bracket on the back top edge to stabilize the two together and filled the gap with a healthy dose of wood filler.


I basically made a box out of plywood for the two to sit on and then used wood filler again to smooth out the areas where the cabinets attach to the plywood. I also reattached the feet to the bottom and I had to turn around one of the doors since they were originally facing in the same direction.

I sanded and painted it and voila!

The white cabinet I simply used as is and hung it on the wall above. Actually, all of the knobs were shiny silver so I spray painted them to look brushed.

Best little corner of the house!

After all that, a cappuccino was in order 🙂

Like I said, I recommend this for anyone that appreciates a good cup of joe. It would be a much simpler project if you have an old chest or dresser that you could revamp and maybe do some simple open shelving on the wall with hooks to hang your cups. The possibilities are endless!

I am way behind on my checklist for make-over completion and I have only a week to get it done! Here is what I have left (in no particular order)

  • Buffet
  • Window covering
  • Artwork
  • Table extension
  • Chair redos
  • Stool redos (plus I need to find one more)
  • Rug
  • Apron holder
  • New menu board (in progress)
  • Chandelier revamp

YIKES! This is list is frighteningly long! Anyone want to volunteer to help?

The chandy, rug, apron holder and window covering are lower priority but I haven’t given up yet. I still have hope that I can finish all of this so please join me in my fantasy world and try to keep up because I’ll be moving at warp speed this week. Thank goodness my coffee bar is done; I see lots of espresso shots and abnormally large pots of coffee in my immediate future!

Have a fantastic Sunday and GO COWBOYS!

DIY Lamp from Vase

I am in super scramble mode as Thanksgiving is sneaking up on me a bit quicker than I thought it would. My brother and his girlfriend will be here on the 19th so that is my deadline to have my dining room make-over completed. YIKES! With less than two weeks left I have a TON of work to do still but (fingers crossed) I think I can get it done.

While I wait for paint to dry on other projects I decided to tackle a project I’ve wanted to do for a while. It was surprisingly quick and easy! I had heard that you can drill holes into glass using a carbide bit and knew exactly what I was going to do. A few years ago my sister gave me two large sea foam colored glass vases (which she got from Ross more than 5 years ago for $9 each) and I’ve always thought they would make great lamps. In addition to that, I came across some FREE drum style lamp shades that I’ve been dying to make use of. With the help of a carbide drill bit and lamp kit from Lowe’s I am now the proud owner of a self-made $30 lamp…and I love it!

Please excuse the terrible iPhone pics!

I like that it’s a bit worn and it’s transparent enough that you can see the cord a bit but you could always paint it. Spray paint on the outside for a matte finish or use watered down paint on the inside for a glossy look.

I plan on converting the other vase just the same and these two handsome guys will make their new home in my dining room when the new buffet is done (should be ready this weekend!).

Here are the simple steps.

Vase

tape an x in the spot where you want the hole and slowly drill, spritzing with water often to keep everything from over heating. You will need to go MUCH slower than you would if you were just drilling a hole into wood. This is going to take time and patience!

see the hole??

now rinse it out and let it dry THOROUGHLY (the hard part)

follow the directions on the lamp kit and attach your lamp shade!

This vase had a ball shaped lid with cork so I just removed the ball and used the cork as a way to hold the bulb housing in place. You could always just buy a chunk of cork and cut it to size.

Love!

It’s very likely that my coffee bar will be ready for sharing tomorrow (that’s the goal anyway) so stay tuned!

The 2 Hour Multi-way Chunky Button Scarf

This is my favorite scarf. I get compliments every time I wear it and it’s soo quick and simple! It’s also very versatile since it can be worn several different ways. I’m sharing the pattern but these will also be available for purchase in my Etsy shop starting today.

To make one you’ll need:

5 3.5 oz balls of medium (4) weight yarn. I used Stitch Nation’s full o’ sheep wool yarn in the colors “little lamb”, “poppy”, “thyme”, “mediterranean” and “passion fruit”

A giant crochet hook (not sure what size!) and a F/5 or 3.75MM hook

A small amount of poly-fil or cotton stuffing

Tapestry needle

You’ll be working with all 5 colors at the same time so arrange your balls of yarn so that you can easily pull from each one with an even amount all at once.

Gather the ends of the 5 yarns and make your slipknot leaving about a 9 inch tail.

Ch 10 using your giant hook.

Row 1: Sc in second ch from hook and continue with a sc in each chain until the end. Ch 1 and turn.

Row 2-7: sc in each sc then ch 1 and turn

Row 8: ch 4 sc into second sc from hook. ch 5 skip one and then sc into next. ch 5 and then sc into next. ch 5 and then sc into last on that row. ch 5 and turn.

Rows 9 & 10: sc into the first loop then ch 5 and repeat across until the end of the row. ch 5 and turn.

Rows 11 & 12: sc into the first loop then ch 6 and repeat across until the end of the row. ch 6 and turn.

Rows 13 – 15: sc into first loop then ch 7 and repeat across until the end of the row. ch 7 and turn.

Row 16: sc into first loop then ch 8 and repeat across until the end of the row. ch 7 and turn.

Rows 17 – 19: Repeat row 13

Rows 20 & 21: Repeat row 11

Rows 22 & 23: Repeat row 9 (but ch 3 at the end instead of 5)

Row 24 & 25: sc into first loop then ch 3 and repeat across until the end of the row.

Cut your yarn about 10 in from the hook and then tie off leaving a tassel. Keeping all 5 strands together, cut 7 lengths of 20 inch each. Use these to make the rest of the fringe along each end by folding each of the lengths in half and tieing them into every other ch on each end.

For the button:

1. using the small hook and any of the 5 colors of yarn make a slipknot onto the hook leaving about an 18 inch tail.

2. Ch 3 and join with a slip stitch to make a ring, then make 8 single crochet stitches into the ring; join with a sl st to the first sc.

3. Ch 1 and sc into the same st that you just slipped into. Make 2 sc into each of the remaining 7 st and connect with a slip st to the first stitch then ch 1.

4. For the next round, sc into the same st that you just slipped into and make 2 sc into each of the remaining stitches then connect with a sl st and ch 1.

5. Now, sc into each stitch then connect with a sl st and ch 1. Repeat this row once more.

6. On this row you will decrease your stitches. insert your hook into the next stitch, yarn over, and pull up a loop (2 loops on hook now), then insert your hook into the following stitch, yarn over, and pull up a loop ( 3 loops on hook), yarn over and pull the strand through all three loops on your hook. Repeat this process to the end of your row, decreasing (turning 2 stitches into 1) each time.

7. Cut an 18 inch tail and pull it through your last loop. Stuff the original 18 inch piece into the ball as much as you can. If it’s not round or full enough use the poly-fil to bulk it up a bit. Then thread a needle with the remaining tail and sew the bottom of the ball button closed. Use the same color yarn to sew your button onto the first end of the scarf (where you made the rows of sc).